One of the most common problems with electronic keyboards is keys that don’t respond the way they should. Perhaps one or more notes don’t sound at all, or a note plays sporadically. Or the most telling symptom: a note that always plays at full volume no matter how hard you press the key.
These are all symptoms of dirty or worn out contact strips, the rubber strips that span the keyboard on most synthesizers. And the good news is that repairing these issues is not difficult, not very expensive, and is a great first project for anyone wanting to try their skills at synth repair.
To determine if you have bad contact strips, play chromatically up the keyboard and see:
(1) if specific notes don’t play at all
(2) if specific notes play only at full volume
If you find either symptom, it’s time to clean or replace the rubber contact strips.
What the contact strips do
The contact strips are the interface between the plastic keys and the electronics that make the sound. Somehow, the synth has to tell the sound circuitry what notes to play, when to play them, and how loud each of them should be.
The contact strips do this by means of a rubber “bubble” underneath each key. And inside each bubble is a carbon pad – and that carbon conducts electricity. So when you press down on a key, the key presses down on the bubble, and that carbon pad presses against a circuit board (the key contact board) and completes the electrical circuit. All of this tells the sound engine, “Play note D#5” for example.
Now, how does the synth know to play loudly when you play harder, and softly when you play softer? It does this by using double bubbles! (Sounds like a chewing gum ad…) Each bubble in the contact strip has two carbon pads in it, at slightly different heights. So when you press down on a key, one contact is made slightly before the other. The synth measures the time from the first contact to the second, and it translates this to key velocity – which is then translated to how loudly a note is played.
Some modern keyboards – mostly digital pianos – have three contacts per bubble, for even more responsive velocity sensitivity.
When things go bad…
There are two sources of trouble for contact strips. First of all, they can get dirty. If a drink is spilled into the keyboard, or a bit of grit gets between the contact strip and the key contact board, the proper contact won’t be made, and they key won’t respond as it should.
The other source of trouble is that after a lot of use, the carbon contacts just wear out. The black carbon dots inside the contact strip should have a matte finish, but as they wear, they get more of a glazed, shiny look, and will even show the pattern of the contact surface from the circuit board.
What to do to fix the problem
You’ll need to get the keybed out, and remove the contact strips. This usually only requires not much more than a screwdriver, and unplugging a cable or two. If you can find the service manual for your keyboard online, it can big a big help in the disassembly.
Once the keybed is out, remove what you need to get to the contact circuit boards underneath the keys. The contact strips are attached to these boards, usually via rubber nubs on the strips which fit into holes on the circuit board.
Often, you can leave the keybed plugged in, turn on the keyboard (be careful not to touch any exposed wiring, especially around the power supply!), and you can press a bubble down with your finger, “playing” that note.
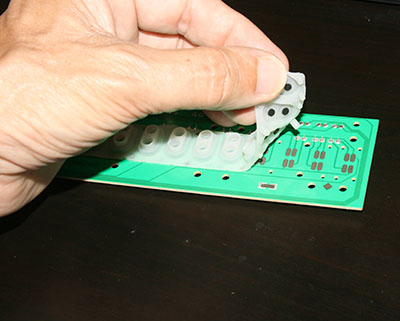
So find the notes that don’t work as they should and pull that contact strip up gently from the circuit board. As you pull, the rubber nubs should come out of the circuit board holes, but you may need to help them along – you don’t want to tear the rubber strip. You can push from the opposite side with a toothpick to help release each nub.
Usually the strips are in octave sections, so you might only need to remove one or two of them. Once a strip is off, take a look at the underside, and see if the carbon surfaces looks glazed. If so, you may want to replace that strip (or all of them, if you’re the proactive sort). If the strip is noticeably dirty, you can wash it in warm water with dish soap.
Likewise, go ahead and clean the contact areas on the circuit board also. Use a Q-tip and 70% rubbing alcohol to swab each contact point.
Once everything is cleaned up, put it back together enough to see if the errant notes work now.
If you still have trouble with a particular note, try swapping that contact strip with another, to see if the problem moves to the new place on the keyboard, or stays on the same note. If it moves with the contact strip, you’ll want to replace that strip. If it stays on the same note, the problem is with the contact board – it’s either still dirty, or it may need repair or replacing.
Installing contact strips
Whether you are replacing a strip with a new one or reinstalling strips that you removed and washed, be aware that some types of strips are a bit too symmetrical – in other words, it is possible to install them backwards. If yours fit only one way, then great – there’s nothing to worry about. But if you can flip it around 180 degrees and it still fits onto the contact circuit board, take a minute and make sure you get it on the correct way.
Remember those “double bubble” strips which have the carbon contacts at two slightly different heights? The keyboard scanner circuit is waiting for the lower contact to hit first, so it can then measure how long it takes the higher contact to hit, and thus tell a note how loudly to play. If the strip is put in reversed, the circuit thinks the two contacts strike at the same time, and it sends the message, “Maximum velocity!” So if you reassemble everything, and you have an octave of notes that all play at maximum velocity, you can be certain that you’ve installed a contact strip backwards.
Key contact board issues
If you have tried everything above, and still have a problem with one particular note, then it’s likely a faulty key contact board. A soda spilled into the keybed can cause circuit board traces to eventually corrode, and this can lead to one or more notes going silent. Cat pee is another terrible fate for a contact board.
Depending on where the damage happened, you might lose either a contiguous grouping of several notes, or you could lose a repeating pattern of notes, such as every F across the keybed, or every 8th note as you play chromatically.
In these instances, your options are either to repair or replace that key contact board, and replacing it is by far the easiest. These boards are not very expensive, and there is a good chance that the one you need is available. Syntaur is likely to have the contact boards and the contact strips available for your keyboard.
If not, you’ll probably need to take your board to a repair tech who can test the traces and make any necessary repairs to them. (This will almost certainly be more expensive than replacing the board, so it’s a last resort.)
Reassemble, and make some music!
Now it’s time to put it all back together, and enjoy being able to play any note you desire – and bask in the pride of having repaired your own keyboard!