
|

|
PLEASE NOTE: While the photos here are representative for this procedure, they may not be of the specific equipment you are repairing.
Important Disclaimer: This information is intended to assist you in repairing your keyboard, which is presumably no longer
under warranty. Doing this type of work will almost certainly void any existing warranty coverage. Syntaur offers this information as a free service,
and makes no warranties of any kind regarding its use. You are solely responsible for any damages, problems, or injuries resulting from opening up
and working on your equipment. Unless otherwise indicated, the keyboard should be powered off and unplugged while these procedures are being done; otherwise,
you can be exposed to potentially fatal voltages. If you do not feel comfortable or competent in performing these tasks, we strongly recommend taking your keyboard to a
service center. |
You may also want to view:
Opening Up an Ensoniq EPS, EPS-16 Plus, plastic-case Mirage, ESQ-1, SQ-80, VFX, VFX-sd, or SD-1 Keyboard
Replacing Keys
Repairing an Ensoniq VFX showing Keyboard Calibration Error
|
The VFX series - and to a lesser extent, some other Ensoniq keyboards - often suffered from a KEYBOARD CALIBRATION ERROR
when booting up. The problem is from a faulty connection between two circuit boards directly underneath the keys. If you get
this error message, after you press any button, the display will give you the option to RECALIBRATE or IGNORE. If you recalibrate,
you will likely get the same result. If you ignore, your VFX or SD-1 will still work normally - except that the keys will be
disabled (or will work in a very unpredictable way). While that may seem rather pointless at first, it does allow the synth to be played via MIDI,
and you can also play back sequences.
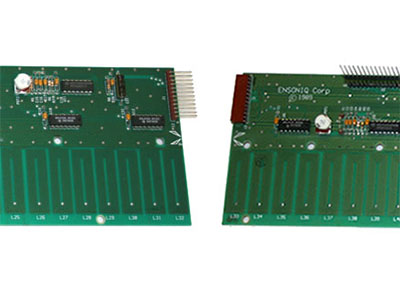
In a pinch, you can often get the keyboard to calibrate by performing the "Heimlich manuever". Lean the keyboard against a wall at a bit of an angle, then press gently in the middle of the top panel just above the keys. (The faulty connector is in the middle of the keyboard.) This can be just enough pressure to temporarily restore the faulty connection. Another trick is to lay the keyboard in your lap, then place a hand on each end and twist slightly in opposite directions. But these are at best temporary fixes. The real solution is to remove the keybed, and hard-wire the connection that bridges the two keyboard coil boards (the two circuit boards underneath the keys). On the top side of these two boards are brown connectors that mate together (see top photo - these connectors are hidden by the keys). The problem is that the mating pins of these connectors are not making proper contact. To correct this, you can hard-wire the boards together, making redundant contacts. On the bottom side of the coil boards, where the pins of the connectors are soldered through the PC boards, you can simply solder some jumper wires between these pins to make the same connections. The lower photo shows the final result, with jumper wires soldered between the pins of the connectors (the connectors are still in place on the opposite side of the boards). |