
|

|
PLEASE NOTE: While the photos here are representative for this procedure, they may not be of the specific equipment you are repairing.
Important Disclaimer: This information is intended to assist you in repairing your keyboard, which is presumably no longer
under warranty. Doing this type of work will almost certainly void any existing warranty coverage. Syntaur offers this information as a free service,
and makes no warranties of any kind regarding its use. You are solely responsible for any damages, problems, or injuries resulting from opening up
and working on your equipment. Unless otherwise indicated, the keyboard should be powered off and unplugged while these procedures are being done; otherwise,
you can be exposed to potentially fatal voltages. If you do not feel comfortable or competent in performing these tasks, we strongly recommend taking your keyboard to a
service center. |
You may also want to view:
Opening Up an Ensoniq ASR-10 or TS-10 keyboard
Removing the Display Board from an Ensoniq ASR-10, ASR-88, TS-10, or TS-12 Keyboard
Repairing Ensoniq and Studiologic Panel Buttons
|
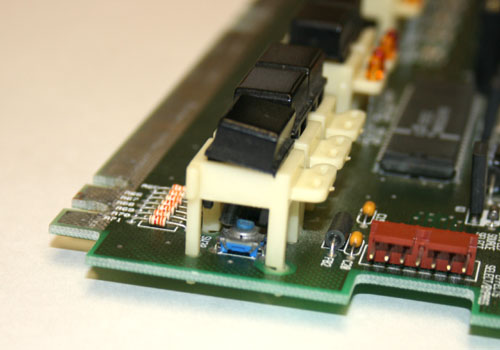
With the display board removed, you can take a good look at a faulty button assembly and quickly diagnose whether the trouble is the result of
the button itself, or of a defective tact switch. Each black plastic button snaps into a nylon guide, which holds it in place directly over a tiny tact
switch which is soldered to the display board. Most button issues are not a problem with the switch itself; they are a
result of the plastic button itself either breaking or becoming misaligned in its guide.
It should be pretty obvious what you need to do to fix the button in question; it will either be misaligned (as shown in the first photo) and can be snapped right back into place, or one of the legs of the plastic button may be broken, in which case you'll need to replace it. Replacement buttons are available from Syntaur; the larger buttons are here, and the smaller buttons are here. |
|
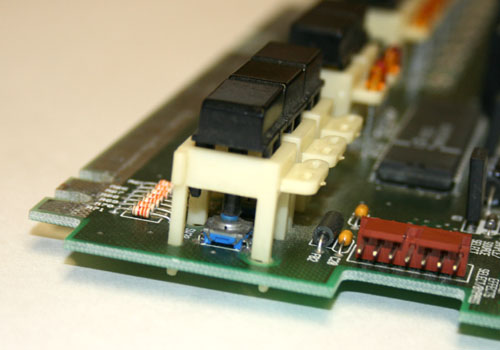
Once the button is correctly in place, its center shaft will sit directly on
the round button of the tact switch (see photo above).
After your button is repaired, you'll need to put everything back together in reverse order. The tricky part will be to get the display board back into place and aligned correctly. If you just lay it in place and screw it in, you will probably find that some of the buttons won't press (or won't un-press) because they are wedged against the hole in the top panel. So instead, lay the board in place, jiggle it slightly to work all of the buttons into the holes, and put just a couple of screws in to secure it. Flip the keyboard over and make sure all of the buttons seem positioned correctly. If they seem good, put in several more screws, and then check to make sure that every button works correctly (mechanically only, of course - there's no power to the keyboard). If all is well, put in the rest of the screws, and reassemble the keyboard. |