|
|
PLEASE NOTE: While the photos here are representative for this procedure, they may not be of the specific equipment you are repairing.
Important Disclaimer: This information is intended to assist you in repairing your keyboard, which is presumably no longer
under warranty. Doing this type of work will almost certainly void any existing warranty coverage. Syntaur offers this information as a free service,
and makes no warranties of any kind regarding its use. You are solely responsible for any damages, problems, or injuries resulting from opening up
and working on your equipment. Unless otherwise indicated, the keyboard should be powered off and unplugged while these procedures are being done; otherwise,
you can be exposed to potentially fatal voltages. If you do not feel comfortable or competent in performing these tasks, we strongly recommend taking your keyboard to a
service center.
This page and its contents are copyrighted by Syntaur Productions, and may not be copied or distributed without written permission. |
Replacing Rubber Contact Strips
|
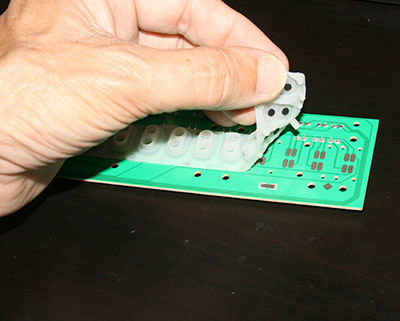
You will have to remove enough keys so that the strip you need to replace is uncovered. While some strips span just four or five notes, most cover an entire octave. So remove all of the keys necessary to uncover the entire strip. Then, grab the strip by a corner and gently lift it away from the printed circuit board (PCB). The strips have rubber nubs that fit into holes in the PCB, so work these nubs free gently; if you yank too hard and fast, you could tear or damage the rubber strip. Note that the strip has two contacts per bubble, one higher than the other. You will need to orient the new strip in the same way on the circuit board. Place the new strip in position, and use a toothpick to gently work the nubs into the holes. Once the strip lies flat against the circuit board, you can replace the keys. If you get everything back together and find out that the repaired notes always play at maximum velocity or otherwise don't work correctly, you have probably installed the strip backwards. Remove it, switch it around end-for-end, and reinstall it. |

