
|

|
PLEASE NOTE: While the photos here are representative for this procedure, they may not be of the specific equipment you are repairing.
Important Disclaimer: This information is intended to assist you in repairing your keyboard, which is presumably no longer
under warranty. Doing this type of work will almost certainly void any existing warranty coverage. Syntaur offers this information as a free service,
and makes no warranties of any kind regarding its use. You are solely responsible for any damages, problems, or injuries resulting from opening up
and working on your equipment. Unless otherwise indicated, the keyboard should be powered off and unplugged while these procedures are being done; otherwise,
you can be exposed to potentially fatal voltages. If you do not feel comfortable or competent in performing these tasks, we strongly recommend taking your keyboard to a
service center. |
You may also want to view:
Opening Up an Ensoniq ASR-10 or TS-10 keyboard
Ensoniq ASR-10 Screw Guide
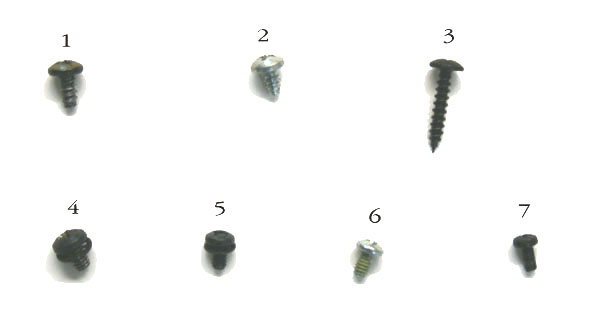
| Here is a guide to the screws that hold your ASR-10 together. First of all, note that there are two basic types of screws used. The top row (#1 through #3) shows self-tapping screws with coarse, tapering threads. The bottom row (#4 through #7) shows screws with fine machine threads. | |
|
Bottom Panel: The bottom panel uses three different types of screws. The six along the front edge are self-tapping screws
(#1 in the photo, Syntaur part #2075). All of the screws on the back, all of those along the sides,
and the row of screws parallel to the front edge are #4 (Syntaur part #2391; those on the back should
have the lock washer, as shown in the photo). The last two screws, parallel to the right edge (directly underneath the highest "A" note) are the smaller #5 screws.
SIMM Memory Trap Door: Uses the #4 screws (Syntaur part #2391). Note that these do not have to be removed to take off the bottom panel of the keyboard. Main Board: Uses eight #6 screws (Syntaur part #5204). Note that the two screws into the aluminum heat sink use lock washers. Digital Jack Board: This is the small board with the MIDI, pedal, and digital I/O jacks. Uses four #6 screws(Syntaur part #5204). Analog Board: Uses six #6 screws (Syntaur part #5204). Analog Jack Board: This is the small board with the audio jacks. Uses four #6 screws (Syntaur part #5204). Disk Drive: Uses four #7 screws. Display Board: Uses ten #2 screws (Syntaur part #2203). Power Supply Board: Uses three #6 screws (Syntaur part #5204) with lock washers on the side near the middle of the keyboard, and three #2 screws (Syntaur part #2203) along the back edge. Transformer Panel: Uses four #2 screws (Syntaur part #2203). Keybed: Uses six #3 screws (Syntaur part #3292) along the front edge, and seven small black self-tapping screws (not pictured here, Syntaur part #2141) along the back edge of the keybed. Metal Support Brackets: The sheet metal brackets which cross from the back panel to the middle of the keyboard use the #2 screws (Syntaur part #2203) where they mount to the back panel. The cross-bracket between two of these uses two #6 screws (Syntaur part #5204) with lock washers. |